Organizing your Myzone Users into groups streamlines management, makes generating member reports easier, and sets you up to run engaging member challenges within your facility. If you’re planning an inter-group challenge, setting up groups is essential. You can easily add or remove group members at any time to match the evolving needs of your club. Let’s walk through the simple steps to set up and manage your groups:
NOTE: In order to create member groups, you will need to have Owner permissions.
Log into your Management portal at https://manage.myzone.org and select Users from the left hand side menu.

In the top right corner, you will find a Create Group button, above your list of users.

The Create Group window will appear from the right hand side. You must give your group a name, assign a colour and add users before you are able to save the group.
Step 1: Assign a name
Step 2: Add users
Step 3: Assign a colour
Step 4: Create group

After clicking Create, you will return to your list of users. Those you added to the group, will have the relevant group label assigned to them. Clicking a group name will filter the list of users. You can also use the Group option at the top apply a filter.

How to add users to an existing Group
To add users to an existing group simply select the users you wish to add my selecting the checkbox against their name, then use the Add to Group button available at the bottom of the page.

The Add to Group window will appear from the right hand side, where you can select the group you wish to add them to then confirm your action. 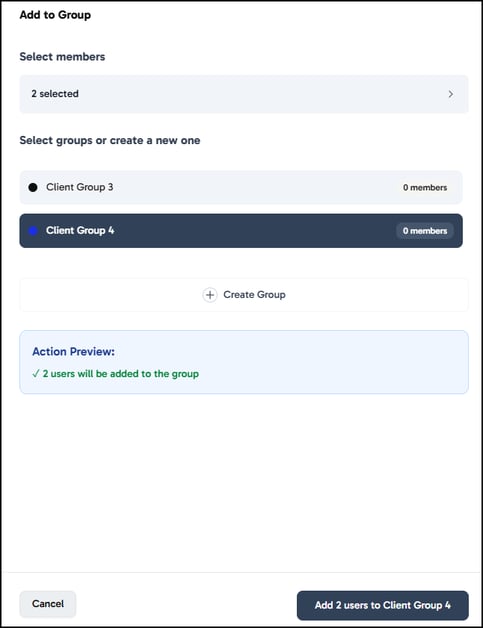
How to edit a Group
To edit an existing group, click the Group dropdown in the top right corner above your user list. Next to each group name, you’ll see a pencil icon—click this to edit your group’s details. You can change the group name, add and remove users from the group and assign a different colour. Make sure to click Apply to save any changes you make.

How to Remove a User from a Group
To remove a user from a group, simply select the correct group from the dropdown, or click the group label against a user already in that group, to filter the user list.
Use the checkboxes to select the users you want to remove, then click the Delete from group
How to Delete a Group
To delete a group, select the group from your list and click the pencil icon against it. In the bottom left corner of the window that appears you will find Delete. Make sure to click Save changes to apply the change.
