Adding Live Content
First, log into the Admin Portal, then click Classes>Class Scheduler. Select Online or Other.
Class Type: Keep class type on Live Video.
Video URL: Paste your Zoom Link in the URL field.
Class (optional): In the class drop down, you can select a Zone Match class in tandem with your live class. A prescriptive tile will appear on the screen so participants know which zone they should be in. Build your zone match class prior to this step.
Class Name: Enter the name of the class as you would like it to appear in the app for booking.
Duration: Enter the length of your class in minutes.
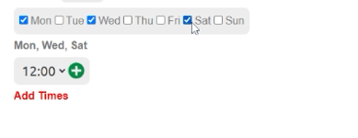
Select your days and times: If your class runs multiple days at the same time, you can add these all in one step. Check the boxes next to the days it will run and then set the time below. Click the Green Plus to add it, and then the green check to add it to your calendar.

Make it Bookable: Click the settings cog ![]() to the right of the class on the schedule and check "Allow Bookings."
to the right of the class on the schedule and check "Allow Bookings."
Scroll to the bottom of that page and click the green check to save.

Adding Pre-recorded Content:
Follow the same steps as above with these changes:
Class Type: Pre-recorded Video
Pre-Recorded Video: Select your class from the drop down. This will automatically complete the class name and duration.
